How to Exclude a Page from Search Engine Indexing in WP
Managing a website entails aiming for the highest visibility in search engine results pages (SERPs). This objective necessitates the utilization of various optimization strategies to persuade search engines of the relevance and worth of your content.
Indexing your website’s pages is the foundational step towards elevating their presence in SERPs, ensuring that search engine bots can crawl and present your content globally. When managing your WordPress website’s SEO and content, it’s important to understand how to exclude a page from search engine indexing in WP, and you can further enhance your site’s functionality by learning how to embed a Google Calendar into WordPress.
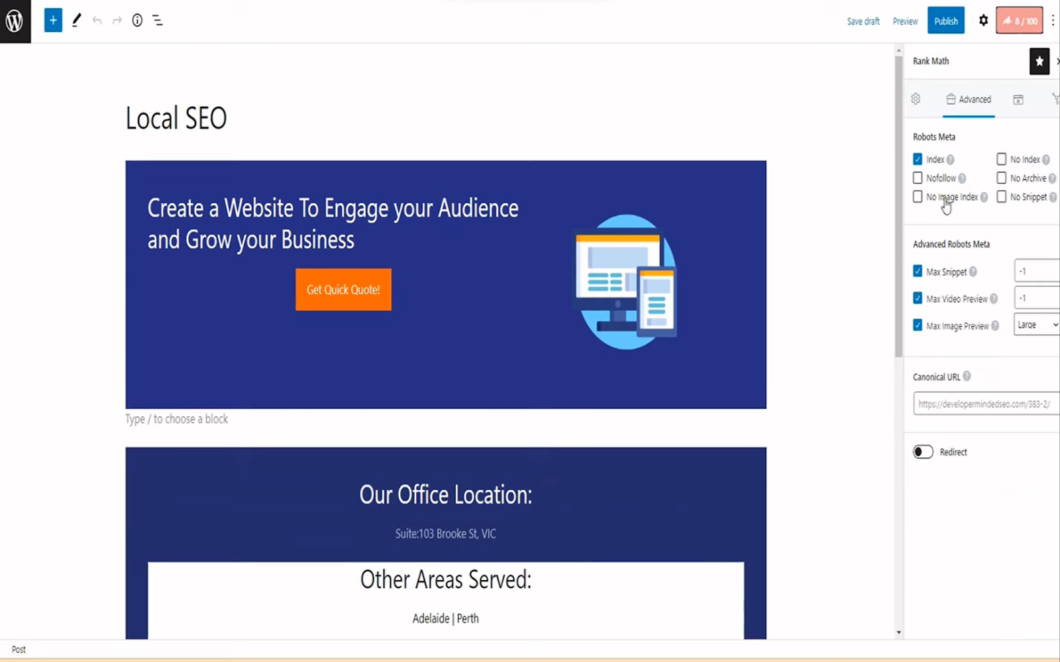
While password-protecting pages is an option to restrict user access, it doesn’t conceal them from search engines. There are instances when it’s more strategic to prevent a page from being indexed, or ‘noindexed,’ in WordPress. To achieve this, you need to apply the noindex directive, allowing bots to crawl the page without including it in their rankings.
This guide will delve into the essentials of setting a WordPress page to noindex.
6 Reasons for Using the Noindex Tag on WordPress Pages
At first glance, opting to noindex a WordPress page may appear counterintuitive, yet there are compelling scenarios where such a measure is prudent. In this article, six such scenarios are presented where setting a page to noindex is beneficial.
| Privacy Concerns | Protect sensitive data and user information |
|---|---|
| Avoiding Duplicate Content | Show only one version of content to avoid penalties. |
| Resolving Keyword Cannibalization | Index the most relevant pages for specific keywords. |
| Pages with Marginal User Benefit | Hide screens like ‘Thank You’ or admin login interfaces. |
| Concealing Incomplete Content | Keep unfinished content hidden until it’s polished. |
| Segregating Third-Party Contributions | Hide unrelated third-party content from search engines. |
The next step is understanding the implementation of the noindex directive to accomplish this.
Implementing Noindex for a WordPress Page via Yoast SEO
Leveraging Yoast SEO to shield your web content from search engines is straightforward and suitable for WordPress users at any skill level.
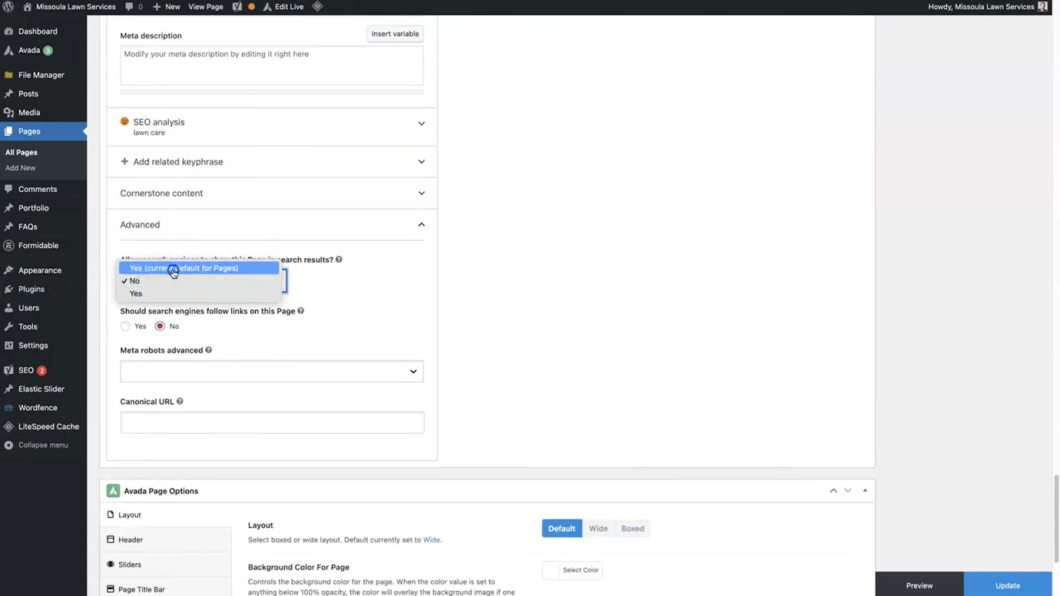
- Begin by installing and activating the Yoast SEO plugin. Navigate to the WordPress dashboard, select the post or page you wish to conceal, and locate the Yoast SEO metabox positioned beneath the page editor. Click on the ‘Advanced’ section within this metabox;
- Here, you’ll find several settings, but your focus should be on the first two. The initial setting enables you to bar search engines from displaying your page in their results. The subsequent option prevents these engines from tracking the links present on your page;
- The nofollow attribute is typically redundant for most pages. However, it becomes pertinent when it contains paid links or user-generated links in comments, which might not be reliable or could contravene Google’s Webmaster Guidelines due to their promotional nature;
- For most scenarios, simply applying the noindex tag suffices to exclude pages from the search engine’s index;
- After adjusting these settings in Yoast SEO, ensure that you save the modifications to effectuate them.

Noindexing a Page in WordPress with the robots.txt File
Noindexing in WordPress through the robots.txt file is a method that may not be suitable for beginners, as it involves making alterations to the robots.txt file.
- To access this file, you can either connect to your server using FTP or utilize the File Manager within your cPanel;
- Alternatively, you can access the robots.txt file through the Yoast SEO plugin. Simply navigate to SEO > Tools and select File Editor.
If you already have a robots.txt file, it will be displayed at the top. If not, you can create one yourself. Google provides a helpful article on how to create a robots.txt file. To prevent a page from being indexed by search engines using the robots.txt file, insert the following lines of code into the file:
User-agent: *
Disallow: /the-URL-of-your-page/
The first line of code specifies particular bots and search engines you may want to target. If you wish to include all search engines, use an asterisk. In the second line of code, insert the URL of the page you want to hide, but be sure to exclude your website’s domain name.
For example, if the URL is “http://aweekendinthecity.com/2020/music/indie-rock,” you should input:
User-agent: *
Disallow: /2020/music/indie-rock/
Once you’ve finished, consider testing your robots.txt file to ensure that everything is configured correctly. If you’ve just created the file, remember to upload it to the root directory of your website.
The Risks of Using the robots.txt File to Hide Content from Search Engines
Apart from not being particularly beginner-friendly, this method carries several risks, which is why it is not recommended.

Noindexing a Page in WordPress Using the ‘noindex’ Directive
An alternative method to keep your page hidden from search engines involves incorporating a noindex meta tag into your page’s HTML file or including a noindex header in the HTTP response headers. To ensure the effectiveness of this approach, it’s essential to note that Google recommends not blocking your page with a robots.txt file. Otherwise, search engine bots will not even encounter the ‘noindex’ directive.
Implementing the ‘noindex’ Meta Tag in WordPress Pages
To signal to search engines that you do not want a specific WordPress page indexed, you should insert the noindex meta tag within the <head> section of the page’s HTML code:
<meta name="robots" content="noindex" />If you wish to restrict only Google’s crawler, Googlebot, from indexing the page, use the following tag:
<meta name="googlebot" content="noindex" />Please note that despite adding the noindex meta tag to your page, certain search engines may continue to crawl the page.
Adding the ‘noindex’ Directive to HTTP Response Headers
If you want to prevent search engines from indexing your webpage, you can achieve this by implementing the ‘noindex’ directive in the HTTP response header. Here’s how you can do it:
To start, you can utilize the X-Robots-Tag and include the following HTTP response within the header.php file:
header("X-Robots-Tag: noindex", true);If your goal is not only to prevent indexing but also to stop web crawlers from following the links on your page, you can use the following HTTP response:
header("X-Robots-Tag: noindex, nofollow", true);What’s remarkable about the X-Robots-Tag is its flexibility. It allows you to implement all the directives available in a robots meta tag while providing greater control. While a standard robot tag manages indexation on a page level, the X-Robots-Tag offers a more comprehensive approach. For example, if you want to prevent search engine crawlers from indexing specific elements like images or video files within a page, the X-Robots-Tag is your tool of choice.
Choosing the Right Method: Noindexing Pages in WordPress
After considering all the options, our top recommendation for noindexing a page in WordPress is the Yoast SEO plugin. It offers a straightforward and effective solution, requiring no advanced expertise to use. Importantly, the changes made with Yoast won’t impact your site’s root directory.
Nevertheless, if you prefer to explore other methods, feel free to do so. Ultimately, the key objective is to successfully prevent search engines from accessing and indexing your WordPress page or post using the method that suits your comfort level best.
Conclusion
Understanding how to implement the noindex directive in WordPress is an essential skill for any website owner. The noindex directive is a powerful tool when used correctly, allowing you to control the visibility of specific content on your site in search engine results. Whether you choose to utilize a plugin like Yoast SEO or manually adjust your robots.txt file, the end goal remains consistent: to confidently manage your site’s SEO and your digital presence.


